First Steps
In this section we will try to cover some basics to work with this module.
Installation
Just use: pip install BCO
Documentation
The documentation is available at http://bcoweb.mpimet.mpg.de/systems/BCO_python_doc/index.html.
Tutorials
Basics demonstrated on the Radar
To work with the Radar class we need to import it:
>>> from BCO.Instruments import Radar
First we want to initiate the Radar class. We therefore only need to provide a timewindow with “start” and “end”, for
which data will be used. Additionally we could change the Radar class from using Default: device=”CORAL” to
device=”KATRIN”. To have a look at all parameters check the Radar documentation.
In this example we will use the default CORAL data and therefore name our class “coral”:
>>> coral = Radar(start="20180101", end="2018010315")
Now we have initiated an instance named “coral” which uses data from the 1st January 2018 00:00 UTC to the 3rd January 2018 15:00 UTC. Trailing Zeros do not need to be supplied.
To review the loaded data and to see all the available methods and attributes we can simply print out the class itself:
>>> print(coral)
==================================================
Instrument : CORAL
Timespan   : 01/01/2018 to 01/03/2018
Timesteps  : 21440
Files from : /pool/OBS/BARBADOS_CLOUD_OBSERVATORY/Level_1/B_Reflectivity/Version_2/
--------------------------------------------------
Methods    : close()
             getLDR()
             getMeltHeight()
             getNoisePower()
             getRMS()
             getRadarConstant()
             getRange()
             getReflectivity()
             getSNR()
             getTime()
             getTransmitPower()
             getVelocity()
             help()
             quickplot2D()
Attributes : azimuth
             data_version
             device
             elevation
             end
             lat
             lon
             north
             path
             pathFlag
             skipped
             start
==================================================
Lets get started loading some data with this class using its methods. We want the timesteps, the range and the reflectivity:
>>> coral_time = coral.getTime()
>>> coral_range = coral.getRange()
>>> coral_ref = coral.getReflectivity(postprocessing="Zu")
Mind that some methods have parameters. Most methods will have a default for their parameters, but it can be necessary to change these defaults. Here for the reflectivity instead of the default “filtered reflectivity Zf” we have used the “unfiltered reflectivity Zu”.
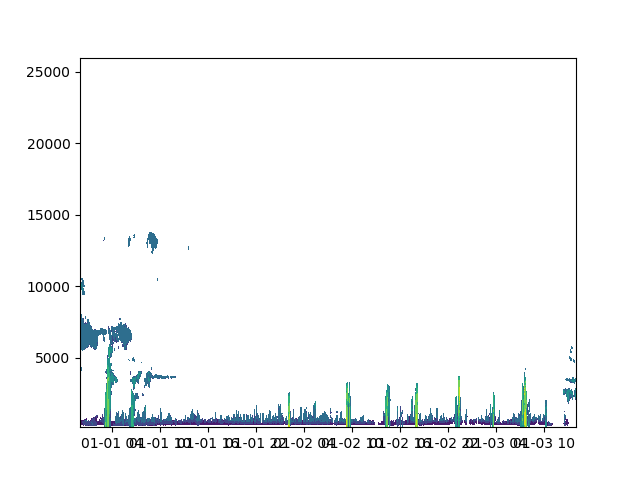
We could now have a look at what data we have loaded by simply using matplotlib.pyplot:
>>> import matplotlib.pyplot as plt
>>> plt.contourf(coral_time, coral_range,coral_ref.transpose())
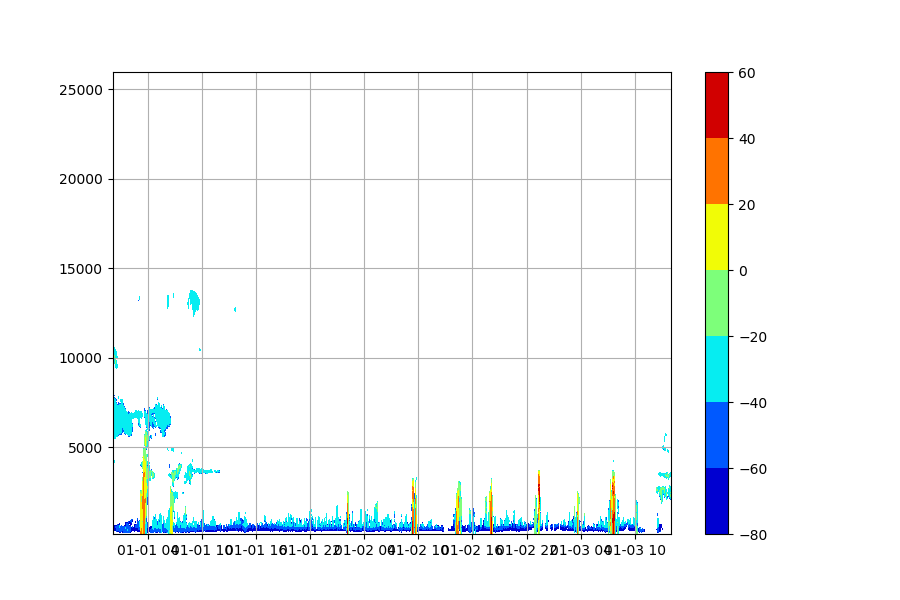
Another way to quickly have a look at the data from your instance is using the
quickplot2D() method of the Radar class:
>>> coral.quickplot2D(value=coral.getReflectivity(),save_name="test.png")
Methods are chainable with the instance of a class, which means that it is possible to load the data directly:
>>> coral_ref = Radar("20170723","20170723").getReflectivity()
Setup the package for ftp-access
When loading the package BCO, it will try to determine if you are inside the mpi or zmaw network and adjust the settings if you are not. You can manually tell the package to only retrieve data over the ftp server with:
>>> import BCO
>>> BCO.settings.set_ftp(True)
To download data over the ftp server you need a username and password. You can get these from Marcus Klingebiel (marcus.klingebiel@mpimet.mpg.de). Please store the username and password in a file at a place which never will be under version control.
If your username is “test_user” and your password is “my_passwd” store these in a file. The file should unly contain 2 lines:
ExampleFile:
user=test_user
passwd=my_passwd
The file needs to have the keywords “user” and “passwd” in two separate lines, followed by a “=” and then the arguments.
Now you need to tell the package the path to this file:
>>> BCO.settings.path_to_ftp_file("/home/.../test_user/my_ftp_settings.txt")
Successfully loaded username and password
You will get a message telling you that your file has been found and that it has the right format.
At this point you can use the whole package as if you were inside the mpi-network. The only difference is, that when you initiate an instance of an instrument, the needed data will be downloaded from the ftp server and stored at the local directory for temporal files (in unix usually /tmp/).
>>> from BCO.Instruments import Radar
>>> coral = Radar("20180101","20180101")
Downloading...
The netcdf file for the radar data from the 1st of january 2018 would then be dowloaded to you local machine. Afterwards you can use the methods and attributes as described in the Basics demonstrated on the Radar.
You can also have a look at the jupyter notebook “FTP-example.ipynb” in the folder “examples” of the package.